Start your online presentation like a pro. NOT like this.

Usually, we aren’t very photogenic when trying to navigate our computers


”How many ways are there really to shift to slideshow-mode?” I found myself wondering recently as one presenter after the other displayed yet a different way of going to slideshow in PowerPoint and Keynote during a three-day series of sessions with multiple speakers/presenters.

”But why on earth do they waste time, momentum and audience attention by not having done it beforehand?” was my next thought.

Because that is what happens. We lose pace, momentum …and authority by starting our presentations like that.

The all too common way online presentations start

The host builds expectations ahead of your presentation….”And now, here is…..drumroll…the session we all have been waiting for!!!”

Next:

  • ”I’m just gonna share my screen”
  • (How the heck do I do that?)
  • ”Hello, Host, can you please give me permission to share my screen?”
  • (Hmmm, should I share my entire screen or just PowerPoint/Keynote?)
  • (Oh, yeah, I need to push that darned share-button too) – in Zoom, that is
  • (Where’s my presentation now) – searching for all to see
  • Sure, show your slides to all of us while you search for how to go into slideshow mode – the know-it-alls in the audience think
  • Then shift into slideshow-mode in yet another way
  • ”Do you see my screen now?”

= a sure way to lose momentum and audience enthusiasm, and to have to start by recapturing participant attention and focus.

We all know the importance of the first seconds of a presentation. Of capturing and engaging the audience. This way is everything but that.

Follow these simple steps instead

Instead, just use these dead simple steps. They work in Zoom, MS Teams and most other meeting services.

  1. Remind the host to give you permission to present – ahead of your session
  2. Bring your presentation into slideshow-mode AHEAD of your turn
  3. Then use clicking TAB while pressing Alt on your PC to move between your slideshow and the meeting software (or any other open applications on your computer, for that sake). Command + Tab on Macs. (When first publishing these tips in Swedish on LinkedIn, I quickly realised that this shortcut was unknown to surprisingly many people. Personally, I don’t know how I would have coped for the latest decennia without it.)
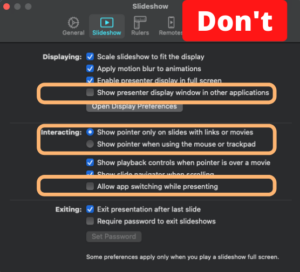
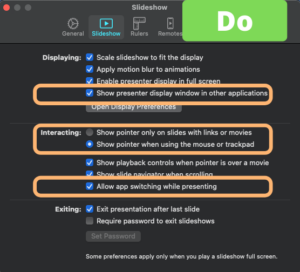
  4. Then share:
    • ONLY your presentation if you’re only going to show slides (then you minimise the risk of showing off your irrelevant notifications to your audience)
    • YOUR ENTIRE SCREEN if your going to demo or show more than slides only (but then you should put you computer in night mode or turn off as many other software and notifications as possible or be ready to show them off to the world)
  5. Do NOT ask ”Do you see my screen now?”. Follow my simple advice here instead: No more “Do you see my screen now?”
  6. Practice ahead of time. Not just the running of your presentation, but the actual handling of the meeting service and the sharing of your screen/deck.

Because, what’s the point in investing time and effort in a great and convincing presentation if you’re prepared to erode that investment by the way you start it all.

Do you have any presentation hacks to share as well? Please do so in the comments.


Do you see my screen now?

How many times haven’t we heard this question in digital meetings since the spring of 2020.

Completely unnecessarily!

No more ”Do you see my screen?”

Instead of asking this superfluous question, revealing your insecurity at handling modern meetings, find out yourself what they see! Simply join the meeting on a second device – as participant. Use your mobile phone or your iPad as in did for the picture. Or on a PC if you usually use a Mac or the other way around.*

Just make sure to avoid joining the audio part of the meeting, to avoid disturbing sound feedback.


You actually get two extra benefits:

  • *You get a better understanding of the meetings looking different on different devices (especially between mobile units and computers, but also between PC and Mac)
  • If you use breakout rooms, your ”participant device” will get assigned to one of the rooms which will give you a visual indication of how things are going in there. Do they look comfortable or confused?

You might want to rename your extra device to indicate that it is a passive participant. I sometimes rename mine ”Peter’s ghost participant”.

Not the right mood for a great presentation.
Image by Usman Yousaf on Unsplash

Learn from my mistake. Don’t commit harakiri by Keynote.

You might well have watched ”Death by PowerPoint, the TEDX talk by JD Phillips, on how to avoid boring your audience to death with uninspiring presentations presentations.

This post is different. It’s not for your audience. It’s for you, the presenter. It’s about how to avoid committing harakiri in public in your next online meeting, be it Zoom or MS Teams.

Or, in other words, it’s about avoiding making the same mistake I did in the spring of 2020.

Checking three simple settings in Keynote will save you from public humiliation.

An hour I will always remember, but want to forget

Spring 2020. Loads of people get sent home from their offices, most of them utterly unprepared. Well, I thought, I have worked remotely for over a decade and trained innumerable users in the why’s and how’s of remote collaboration. I have knowledge and experience that others desperately need. So I started doing webinars and sharing tips and tricks. Then came the day when I was due to deliver my first webinar for UP, where I had recently become a member.

UP is the World’s first cloud agency and has worked remotely from the start ten years ago. UP being in advertising, the presentation template was in Apple Keynote of course. So I transferred my slides to Keynote from PowerPoint which I had used before.

As soon as I went into slideshow mode, my nightmare began. When I needed to shift back to Zoom (as you do a lot when presenting online), I couldn’t use Command + Tab to shift between running applications. Then, I suddenly realised that my mouse pointer didn’t show either. It was like navigating blindfolded! I’m rarely struck with tech panic, but this pushed me over the edge and my presentation turned into my worst performance ever. I write this to save you from the same embarrassment.

Blame the sleek style perfectionists at Apple

Apple design is all about less is more. Sleek is just the first name. So, when the designers at Apple made a presentation software years ago, they obviously had in mind that presenting should be sleek and minimalistic. But they designed for presenting on stage, with a beamer. Not for presenting online where you constantly need to shift between your slides and the meeting service. To keep an eye on audience feedback, comments, the chat or shift between showing slides and presenting with you in focus, or participants.

So, they created settings to minimise disturbances on screen. Like ”Show the mouse pointer only on slides with links” and set it ON as default. So, Unless you have a link on your slide, you hav no chance of seeing where your mouse is! Navigating blindfolded in other words.

The next setting was probably intended to avoid mistakenly shift tasks while presenting. They disabled task shifting using the short keys ”Command + Tab” (on Mac) or ”Alt + Tab” (in Windows). That completed my harakiri. Not only could I not see my where my mouse was on the screen. I couldn’t shift back and forth between my presentation and Zoom (or any other meeting software for that sake).

Check your settings, or be doomed

So, before you use Keynote in Slideshow mode for an online presentation, go to the Settings, select Slideshow and make sure to have them as in the second image. NOT as in the first.

Avoid these three settings for any online presentations.

Make sure to have these three settings like this.